PC Won’t Boot – Complete Step-by-Step Troubleshooting Guide (2026)
When You hit the power button. Nothing Or worse — the fans spin and the RGB lights up, but the screen stays black. If your PC Won’t Booting and you have no idea where to even begin, you’re in the right place.
This PC troubleshoot guide guide covers every single scenario — from a completely dead PC to Windows getting stuck in a boot loop — in a clear, step-by-step format. No confusing jargon. No generic advice. Just real fixes, explained properly, so you can get your system running again today. Let’s start from the very beginning.
Step 0: Before You Do Anything — Quick Diagnosis
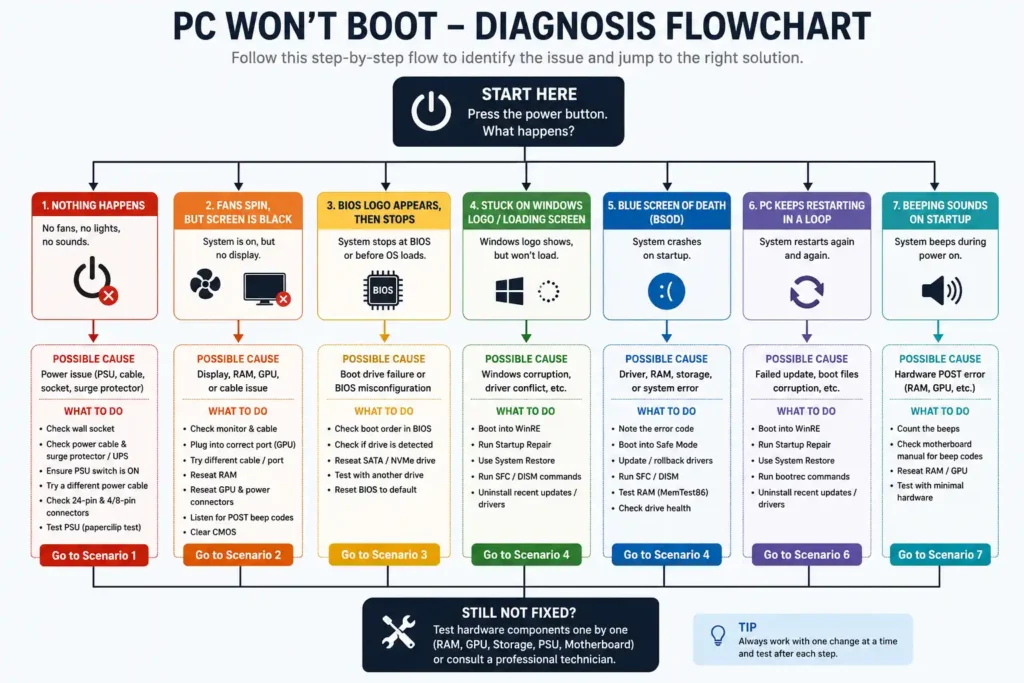
The first thing you need to do is identify what exactly is happening when you press the power button. Your PC can fail to boot in several different ways, and each has a completely different cause.
Read through the list below and find the scenario that matches yours:
| What You See / Hear | Most Likely Cause |
| Nothing at all — no fans, no lights | Power issue (PSU, cable, wall socket) |
| Fans spin but screen is black | GPU, RAM, or display cable issue |
| BIOS logo appears, then stops | Boot drive failure or BIOS misconfiguration |
| Stuck on Windows logo / loading screen | Windows corruption, driver conflict |
| Blue Screen of Death (BSOD) on startup | Driver, RAM, or storage error |
| PC keeps restarting in a loop | Failed update, corrupted boot files |
| Beeping sounds on startup | Hardware POST error (RAM, GPU) |
Match your situation and jump directly to the relevant section below. If you’re unsure, follow the guide from the top — it’s designed to go from the simplest fix to the most complex.
Scenario 1: PC Has Zero Power — No Fans, No Lights, Nothing
This is the most basic failure state. The system is completely dead.
Step 1: Check your wall socket first. This sounds too obvious, but power socket failures are more common than people think — especially during or after a power cut (load shedding). Plug something else (a phone charger, a lamp) into the same socket and confirm it actually works.
Step 2: Check the power cable and surge protector. If you’re using a UPS or surge protector, check if it has tripped. Many UPS units have a reset button. Also inspect the power cable going from the wall to your PSU — make sure it’s fully seated at both ends.
Step 3: Check the PSU switch. On the back of your desktop PC, there is a small rocker switch on the power supply unit. Make sure it’s switched to ON (marked as I). After a power cut, this sometimes trips or gets accidentally turned off.
Step 4: Test with a different power cable. The C13 power cable (the standard PC power cable) costs almost nothing. If you have a spare, swap it out. Faulty power cables are a surprisingly common culprit, especially in older setups.
Step 5: Inspect inside the cabinet. If everything above checks out, open your cabinet. Look at the 24-pin motherboard connector and the 4/8-pin CPU power connector. Press on each one firmly to make sure they haven’t worked loose. A connector that looks plugged in can still be slightly unseated.
Step 6: Suspect the PSU. If the system still shows zero life, your PSU may have died. Power supplies can fail silently — no dramatic spark, no burning smell. To test this without special equipment: unplug all components, short the green wire to any black wire on the 24-pin connector with a paperclip, and plug the PSU into the wall. If the PSU fan spins, the unit is alive. If nothing happens, the PSU is dead and needs to be replaced.
India Tip: PSU failures spike during monsoon season due to voltage fluctuations. If you don’t already have a good UPS with AVR (Automatic Voltage Regulation), this is worth investing in. Brands like APC, Zebronics, and Microtek are widely available on Amazon India and Flipkart.
Scenario 2: Power Is On, Fans Spin, But Screen Is Black – PC no display fix
Your PC seems to be running — you can hear and see it — but the monitor shows nothing. This PC no display fix is one of the most common boot problems. buy best 1080p gaming monitor.
Step 1: Check the monitor itself. Press the monitor’s power button. Make sure it’s on. Check that the display cable (HDMI, DisplayPort, or VGA) is firmly connected at both ends — the monitor and the PC. Try unplugging and re-plugging it.
Step 2: Are you plugged into the right port? If your CPU has integrated graphics (Intel CPUs usually do, AMD Ryzen CPUs usually do too) AND you have a dedicated GPU installed, you must plug your monitor into the GPU, not the motherboard. The motherboard display output is often disabled when a dedicated GPU is detected.
Step 3: Try a different cable or port. HDMI cables can fail. DisplayPort cables can fail. If your monitor and GPU both support multiple input types, try switching. Also try the second HDMI/DP port on your GPU if it has one.
Step 4: Reseat the RAM. Dead-black screen with power on is one of the most classic symptoms of RAM not seated properly. Open your cabinet. Remove the RAM stick(s). Wipe the gold contacts gently with a clean pencil eraser. Then push the RAM firmly back into the slot until both clips click into place. Best SSD in india check here.
If you have two RAM sticks, try running with just one stick. Then try the other slot. Then the other stick. This helps you identify whether you have a bad RAM stick or a bad motherboard slot.
Step 5: Reseat the GPU. Remove your graphics card and firmly push it back in. Make sure the PCIe power connectors (6-pin or 8-pin) are fully plugged in. A GPU that is seated 90% of the way will not work. Best Budget GPU Under ₹20,000
Step 6: Listen for POST beep codes. If your motherboard has a built-in speaker (or if you have one connected), it will beep in specific patterns to tell you what’s wrong. One short beep usually means POST passed successfully. Multiple beeps usually indicate RAM or GPU errors. Check your motherboard’s manual or search “[your motherboard model] beep codes” to decode the pattern.
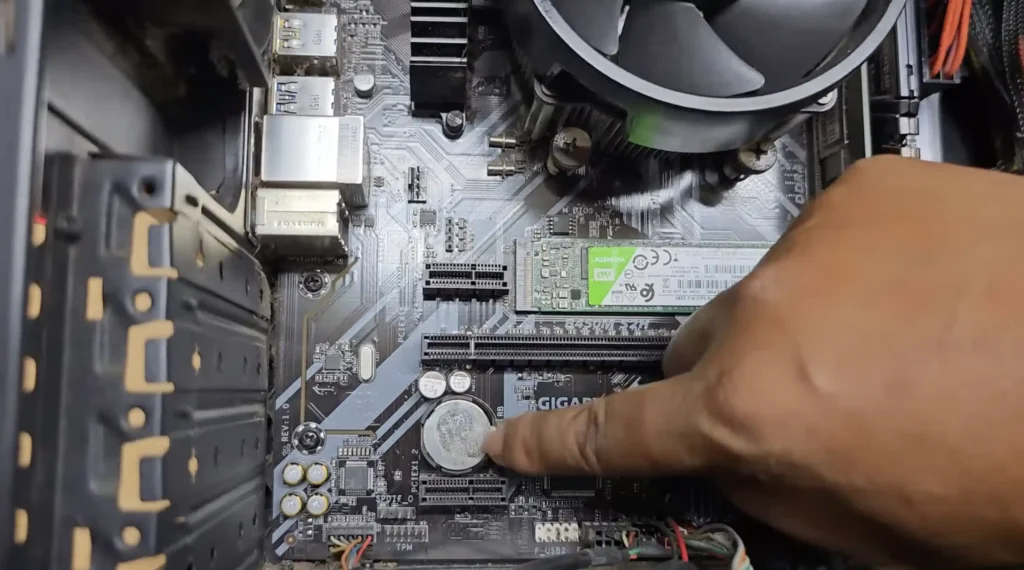
Step 7: Clear the CMOS. If nothing else works, the BIOS settings may be corrupted. To reset them: power off the PC and unplug it from the wall. Find the round, silver coin battery on your motherboard (CR2032). Remove it for 60 seconds, then put it back. This resets BIOS settings to factory defaults and fixes a surprising number of no-display boot failures.
Scenario 3: BIOS Logo Appears, Then PC Stops or Freezes
The PC gets past the initial power stage and you see your motherboard’s logo (ASUS, MSI, Gigabyte, etc.) — but then it freezes, throws an error message, or just goes black.
Step 1: Check the boot order in BIOS. Restart and press Delete or F2 (depending on your motherboard) to enter BIOS. Go to the Boot menu and make sure your primary drive (SSD or HDD with Windows on it) is listed first in the boot order. If it’s not listed at all, your drive may have failed or become undetected.
Step 2: Check if the storage drive is detected. Inside BIOS, look for a storage/SATA/NVMe device list. Your primary drive should appear there. If it doesn’t, the drive may have failed, the SATA cable may be loose, or an NVMe drive may have come partially unseated. Re-seat all storage connections.
Step 3: Look for error messages. If you see “Boot Device Not Found,” “No Bootable Device,” or “Reboot and Select Proper Boot Device,” it almost always means Windows cannot find a valid boot partition. This is usually caused by a failed drive, accidental drive disconnection, or a corrupted Master Boot Record (MBR) / EFI partition.
You can fix this using a Windows bootable USB (covered in Scenario 5 below).
Step 4: Disconnect non-essential drives – Windows boot problem. If you have multiple drives (e.g., one SSD for Windows and one HDD for storage), unplug the secondary ones and try booting with only the Windows drive connected. Sometimes Windows gets confused if multiple drives are connected and the BIOS tries to boot from the wrong one.
Scenario 4: Stuck on Windows Logo or Loading Circle – Windows boot problem
The BIOS stage passed fine, Windows starts loading, but then the spinning circle freezes, disappears, or just loops forever. This Windows boot problem is almost always a Windows-side problem — either a bad update, a corrupted system file, or a driver conflict.
Step 1: Force shutdown and try again. Sometimes Windows gets into a temporary bad state after an unexpected power cut. Hold the power button for 5 seconds to force shutdown, wait 30 seconds, and try rebooting. Do this up to 3 times. After 2-3 failed boots, Windows should automatically launch Startup Repair on the next attempt.
Step 2: Boot into Safe Mode. Safe Mode loads Windows with only the essential drivers — no third-party apps, no fancy GPU drivers. If Windows loads fine in Safe Mode, a recently installed driver or software is your culprit.
To access Safe Mode:
- When the PC starts, immediately press F8 (on older systems) or hold Shift while clicking Restart from the login screen
- Go to Troubleshoot → Advanced Options → Startup Settings → Restart
- Press 4 to boot into Safe Mode
Once in Safe Mode, uninstall any recently added software or drivers, especially GPU drivers. Then restart normally.
Step 3: Run Startup Repair from a bootable USB. If you cannot get into Windows at all, you need a Windows 11 (or Windows 10) bootable USB drive.
Create one on another PC using the Media Creation Tool (download free from Microsoft’s official site). Then:
- Plug the USB into your stuck PC
- Boot from USB (press F12 or F11 at startup to choose the boot device)
- Choose your language, then click “Repair your computer” (bottom-left)
- Go to Troubleshoot → Advanced Options → Startup Repair
Let it run. This automatically detects and repairs many common Windows boot issues. You can read Microsoft’s official Startup Repair documentation for additional recovery options.
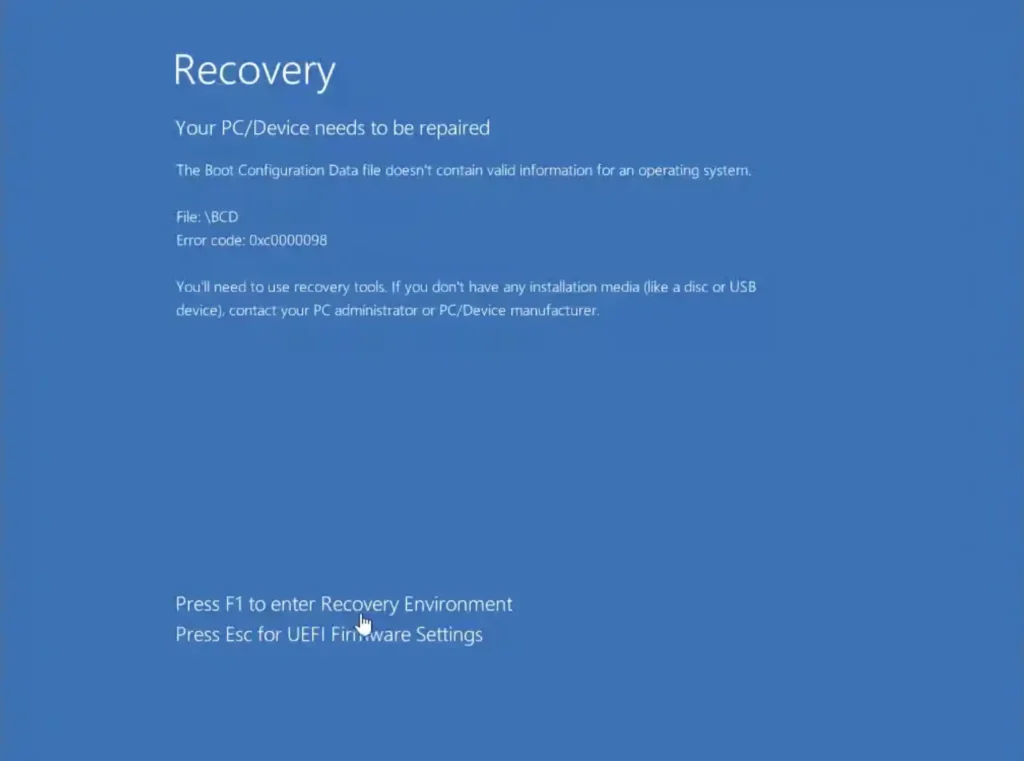
Step 4: Rebuild the Boot Configuration Data (BCD). If Startup Repair doesn’t fix it, the problem may be a corrupted BCD (Boot Configuration Data). From the same Advanced Options menu, open Command Prompt and type these commands one by one:
bootrec /fixmbr
bootrec /fixboot
bootrec /scanos
bootrec /rebuildbcd
Type exit when done, remove the USB, and restart. This fixes a very high percentage of “Windows won’t boot” problems.
Step 5: Run System File Checker (SFC) and DISM. From the Command Prompt in Advanced Options, run:
sfc /scannow
If that finds errors but can’t fix them all, follow up with:
DISM /Online /Cleanup-Image /RestoreHealth
These commands scan for and repair corrupted Windows system files.
Scenario 5: Blue Screen of Death (BSOD) on Boot
A BSOD (Blue Screen of Death) on startup typically shows a stop code like CRITICAL_PROCESS_DIED, INACCESSIBLE_BOOT_DEVICE, MEMORY_MANAGEMENT, or UNMOUNTABLE_BOOT_VOLUME.
Each stop code is a clue:
| Stop Code | Most Likely Cause | Fix |
| INACCESSIBLE_BOOT_DEVICE | Storage driver issue or corrupted boot partition | Startup Repair, BCD rebuild |
| MEMORY_MANAGEMENT | Faulty or incompatible RAM | Reseat RAM, run MemTest86 |
| CRITICAL_PROCESS_DIED | Windows system file corruption | SFC /scannow, DISM |
| UNMOUNTABLE_BOOT_VOLUME | Corrupted or failing storage drive | CHKDSK, check drive health |
| PAGE_FAULT_IN_NONPAGED_AREA | RAM or driver issue | Reseat RAM, roll back drivers |
For most BSOD stop codes, the repair process starts with a bootable USB → Startup Repair → Command Prompt approach (covered in Scenario 4).
For memory-related BSODs, download MemTest86 (free), create a bootable USB from it, and run an overnight memory test. If errors show up, your RAM stick is dying.
For storage-related BSODs, check your drive’s health using CrystalDiskInfo (Windows) or test from the bootable USB Command Prompt:
chkdsk C: /f /r /x
This checks for filesystem errors and bad sectors and can take a while on larger drives.
Scenario 6: PC Keeps Restarting in a Loop
The PC boots, reaches a certain point (BIOS, Windows logo, or even the desktop), then restarts by itself — repeatedly, endlessly.
Step 1: Disable automatic restart on failure. This at least stops the loop so you can read any error messages. From the bootable USB → Command Prompt:
bcdedit /set {default} recoveryenabled No
bcdedit /set {default} bootstatuspolicy ignoreallfailures
Step 2: Identify a recently installed update. Windows updates sometimes cause restart loops. To roll back a problematic update: Boot from USB → Troubleshoot → Advanced Options → Uninstall Updates.
Step 3: Check for overheating. A PC that restarts randomly under load is often a thermal protection shutdown. Make sure your CPU cooler is properly seated (the four push pins on Intel coolers are notorious for working loose). Clean your system of dust — a clogged heatsink can cause the CPU to thermal throttle and restart the system to prevent damage.
When Should You Go to a Repair Shop?
You should consider professional help if:
- Your PC has suffered physical damage (dropped, water/liquid contact, power surge)
- Your primary drive has failing sectors (CrystalDiskInfo shows Caution or Bad status) — this is a data recovery situation, not a DIY fix
- You’ve completed all steps above and the PC still doesn’t boot
- The motherboard shows visible damage — burnt marks, bulging capacitors, damaged PCIe slots
A good local technician or service center can diagnose hardware failures properly. If you’re in India, most Tier-2 and Tier-3 cities now have capable PC repair shops. Brands like Asus, MSI, and Gigabyte also have service centers in major cities for warranty repairs.
Quick Checklist — PC Boot Troubleshooting at a Glance
Use this as your rapid reference:
- Wall socket and power cable working?
- PSU back switch set to ON?
- Monitor cable plugged into GPU (not motherboard)?
- RAM seated firmly, tested one stick at a time?
- GPU seated firmly, PCIe power connected?
- CMOS cleared (coin battery removed for 60 seconds)?
- Drive detected in BIOS?
- Boot order correct in BIOS?
- Windows Startup Repair run from bootable USB?
- BCD rebuilt using bootrec commands?
- SFC and DISM scans completed?
- Drive health checked with CrystalDiskInfo / CHKDSK?
- RAM health checked with MemTest86?
Frequently Asked Questions
Q: My PC was working fine yesterday. What suddenly went wrong?
The most common sudden causes are: a Windows update that installed overnight, a power cut that corrupted system files, a failing hard drive reaching its end of life, or a RAM stick developing a bad cell. Start with the Startup Repair approach (Scenario 4) — it covers most sudden-onset boot failures.
Q: I see “Preparing Automatic Repair” on repeat. What does that mean?
This means Windows detected a boot failure and is trying to repair itself — but failing. This loop can go on forever. Follow the steps in Scenario 4, specifically the BCD rebuild commands. That usually breaks this loop immediately.
Q: Can a Windows update really break my PC?
Yes, it can. It’s rare, but it happens — especially with driver updates for GPU, storage controllers, or chipsets. The fix is usually to uninstall the problematic update or run SFC/DISM to repair damaged system files.
Q: Will fixing the boot issue delete my files?
Startup Repair, SFC, DISM, and BCD rebuilding do NOT delete your personal files. These only touch Windows system files and boot configuration. The only fix that wipes data is a full Windows reinstall — and you should only do that as a last resort after trying everything else.
Q: My PC worked after I reseated the RAM. Why?
RAM contacts can develop a thin layer of oxidation over time, especially in humid environments (very common in India during monsoon). Reseating the RAM scrubs the contacts clean and restores a proper electrical connection. If it happens repeatedly, the slot itself may be damaged.
Q: How do I know if my hard drive is dying?
Download CrystalDiskInfo from its official website. Install and run it on a working PC (or access it via a bootable rescue environment). It reads SMART data from your drive — a Caution or Bad health rating means the drive has failing sectors and should be replaced immediately. Back up your data first.
Final Words
PC boot failures look terrifying, but the most majority of them are fixable without spending a rupee at a repair shop. Work through the scenarios in this guide methodically — starting from the simplest (power cable, RAM seating) and moving toward the more complex (BCD rebuild, SFC).
The key is not to panic and not to skip steps. A “dead” PC that won’t boot is almost always just a PC with one specific, fixable problem. Find that problem, and you’re back up and running.
Bookmark this page for future reference — and if this guide helped you fix your PC, share it with a friend who might need it.

